
Vermiculture: How to Get Started With Worm Composting
Learn how to use worms to turn food scraps into valuable vermicompost for your garden and houseplants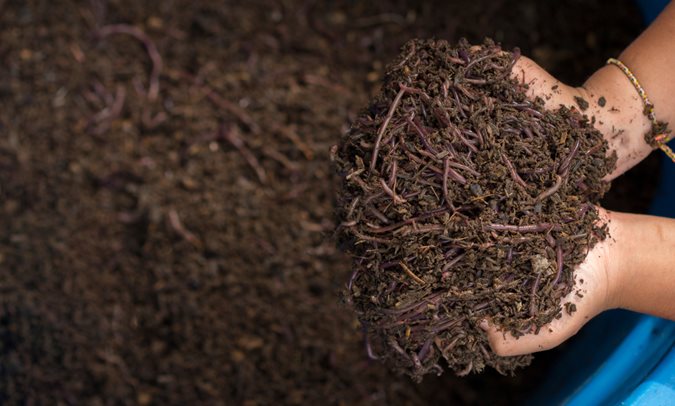
Photo by: SomprasongWittayanupakorn / Shutterstock
SETTING UP A WORM BIN- Find an appropriate location.
- Fill the bin with moist bedding.
- Add a pound of live composting worms.
- Add a cup or two of kitchen scraps.
- Cover the bin with a loose-fitting lid.
- Place drainage tray underneath bin.
Need a reliable supply of nutrient-rich compost to amend the soil in your garden beds and container plantings? It’s easy to make your own if you let worms do most of the work for you.
For millions of years, worms have been nature’s most prodigious recyclers, breaking down organic material and returning the nutrients to the soil. By setting up a simple worm bin, or vermicomposter, you can duplicate the conditions worms require to miraculously convert food scraps into usable compost your plants will love.
WHY COMPOST WITH WORMS?
Raising worms in an enclosed bin produces castings (or waste) that are an amazing source of nutrient-rich organic matter. Worm compost not only outperforms synthetic fertilizers in improving root growth and yielding healthier plants, it also helps suppress plant diseases, according to researchers at Cornell University Waste Management Institute.
Another big plus: Composting with worm castings is an environmentally friendly way to recycle kitchen scraps that would normally end up in the garbage. In fact, many municipalities promote the use of vermicomposting as a way of keeping food waste out of local landfills.
HOW DO WORM CASTINGS DIFFER FROM COMPOST?
Both compost and worm castings are rich in nutrients, minerals, and microbial activity that help plants thrive. Both also help with soil aeration, soil porosity, and water retention. However, the organic matter that has been processed through the specialized digestive tracts of worms contains a higher density and concentration of nutrients as well as beneficial bacteria and enzymes that convert waste into a form more easily absorbed by plants.
Just how nutrient-rich are worm castings? According to the University of Nebraska Extension, they contain 5 times more nitrogen, 7 times more phosphorus, and 11 times more potassium than ordinary garden soil. Worm castings also tend to be a more consistent and reliable source of plant nutrition. When the castings are obtained from the controlled environment of a vermicomposting bin, they are free of weed seeds and other contaminants that can be present in traditional compost. Vermicomposting is also a good way to produce compost indoors during the winter months when your outdoor compost pile is dormant.
WHAT DO YOU NEED TO START A WORM BIN?
A vermicomposting bin doesn’t have to be elaborate or expensive to keep its residents well-fed and productive. All you need is a worm bin, bedding material, worms, food, and a drainage tray.
WORM BIN:
A heavy-duty plastic tote or storage container, with several small holes drilled into it for drainage and airflow, works great. (See this easy DIY worm bin from Washington State University). But you can also find a wide variety of commercial worm bins, including stacked systems that allow for easier harvesting. Because compost worms are surface dwellers and live in the top few inches of soil, the bins don't need to be deep. Generally, a container 8 to 12 inches in depth is sufficient.
Your bin should also have a loose-fitting lid, such as a piece of cardboard or sheet of black plastic, with a few slits cut into it. Red worms prefer a dark environment, but they shouldn’t be deprived of air.
BEDDING:
The bedding is one of the most important components of a worm bin because it provides a hospitable environment for the worms to work and eat their food. Worms also consume the bedding as well as the table scraps you provide, so it must be biodegradable.
Many materials make good worm bedding, including strips of newspaper (black ink only), cardboard, egg cartons, grocery bags, coconut coir, or a combination of these materials. Just make sure that the bedding is non-toxic and ripped up into fairly small pieces. Shredded leaves also make a good bedding material, but might harbor insect pests that you don’t want reproducing inside your home.
Because composting worms need moisture, the bedding material should be moistened before adding it to the bin. If you’re using cardboard or paper, soak it in water and then squeeze out as much moisture as possible until the bedding is about as damp as a wrung-out sponge. Loosely fill the bin about half full with the moistened bedding and then fluff it to permit good airflow. Keep in mind that the bedding material needs to remain moist, so check it often. If it appears to be drying out, mist it with water from a spray bottle.
Tip: Along with the bedding, add a small amount of grit to your bin, such as a handful of garden soil or sand. Composting worms need some grit to help break down food particles and aid in digestion.
COMPOSTING WORMS:
Only use red wiggler worms (Eisenia fetida) in your bin, which you can order online or buy from a local worm farm. Unlike the nightcrawlers you find in your garden, red worms don’t need to burrow deep into the soil to eat and survive.
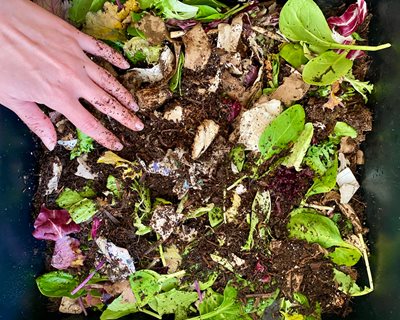
Photo by: Mary Elise Photography / Shutterstock
FOOD:
Finding enough food scraps to feed your worms is rarely a problem, since they will eagerly consume almost anything. But there are some foods you should avoid because they are hard for worms to digest or can cause foul odors.
- Foods to AVOID: Meat, poultry, fish, and dairy products. Fatty foods, such as butter and cooking grease, should also be avoided because they could become rancid.
- GOOD choices for a worm-healthy diet include:
- Most fruits (with the exception of citrus fruits and tomatoes, which are too acidic for worms)
- Leafy greens, such as lettuce
- Vegetables and vegetable scraps (with the exception of onions and garlic)
- Crushed eggshells
- Coffee and tea grounds (in small quantities to prevent the bed from becoming too acidic)
- Banana peels
- Melon rinds
- Bread
- Unsweetened cereal
- Grains
DRAINAGE TRAY:
Since food scraps and moistened bedding contain water, place a waterproof container (such as a kitty litter box or upside down plastic tote lid) underneath the bin to collect any drainage.
HOW (& HOW MUCH) TO FEED COMPOSTING WORMS
When adding food to your bin, bury it beneath the top 2 to 3 inches of bedding to help mask odors and thwart pesky flies. To aid in the decomposition process, chop larger pieces of fruits and vegetables into smaller pieces or run them through a food processor.
How much food to give your worms depends on the size of the population. Red wiggler worms can eat half their body weight every day, so if you’re starting out with a pound of worms, you should provide them with at least three pounds of food scraps per week. (You can gradually increase the amount as the worms multiply.) Also put the food in a different area of the bin at each feeding to keep the worms from congregating in one spot.
Tip: Although compost worms are generally not picky eaters, there are certain foods that may not please their palates. Check your bin to see what food is gone after a few days and what remains, so you can get an idea of their diet preferences. You may want to keep a journal noting how quickly your worms consume certain foods so you can adjust the menu to their liking.
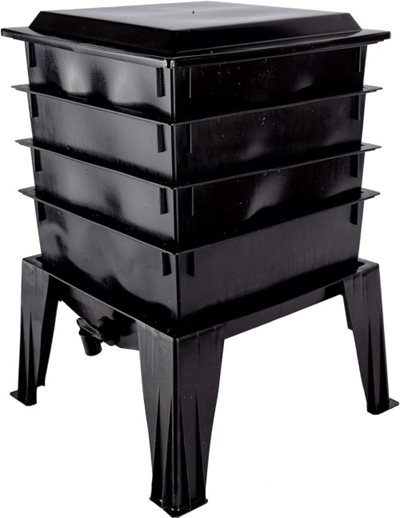
Stackable worm bin. Photo courtesy of Steuwe & Sons
HOW TO HARVEST VERMICOMPOST
After a few months—when your bin is filled with rich, dark compost—it’s time for harvesting. Removing the worm castings also gives you the opportunity to refresh the bedding and keep your bin going.
The easiest way to collect the finished compost is to push the bedding and worms to one end of the bin and fill the other end with new bedding and fresh food scraps. After a couple of weeks, the worms will migrate over to the fresh food and you can scoop out the compost from the other side of the bin. If you’re using a tray-style stackable worm bin, this job is a cinch because it’s designed to separate the composted material into layers.
Another method is to dump the contents of the bin onto a plastic tarp placed under a bright light. Because worms are light-sensitive, they will burrow down to the bottom of the pile and you can then scoop off the compost from the top. You can then move the worms back into their home after lining it with new bedding.
HOW TO USE VERMICOMPOST
Once harvested, you can use your vermicompost immediately or store it in a plastic tub. Add it to your garden beds as a soil amendment, blend it into potting mix, or use as a top dressing for your indoor and outdoor plants. Even though vermicompost is chock-full of beneficial bacteria and nutrients, it also is very mild so you don’t have to worry about harming your plants by overfertilizing.
Tip: Try making a worm compost tea that you can water into the soil or spray directly onto a plant’s leaves. Simply place one or two scoopfuls of worm compost into a permeable bag made from burlap or an old pillowcase and then steep it in a bucket of clean water for 24 hours, or until the tea is light brown in color. Because the tea is full of beneficial living microbes, it should be applied to your plants within a couple of days after making.
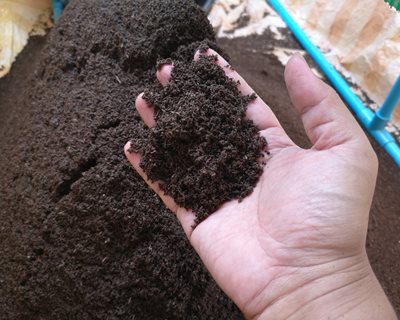
Photo by: Kulchan S / Shutterstock
WORM COMPOSTING DOS AND DON'TS
Red wigglers are highly efficient composters as long as you give them a dark, comfortable home with plenty of food, moisture, and oxygen. To provide the optimal conditions, pay heed to these important dos and don’ts.
- Do cover the food waste well under the bedding, and don’t let anything sit and rot in the bin. If your compost starts to smell, dig through the bedding and remove any food waste.
- Don’t overfeed your worms. When uneaten food is allowed to pile up, it starts decomposing, heating up the bin and cutting off the oxygen supply that worms need to survive.
- Don’t let the bedding become too wet or compacted, which can suffocate your worms. Be sure to fluff the bedding once a week, and if it gets too wet, add dry newspaper strips.
- Do keep your worm bin out of the sun if it’s located outdoors. Temperatures in the 90s and above can dry out the bedding and literally cook your worms, especially if your bin is made from dark-colored plastic.
- Don’t simply buy a pound of red wiggler worms and throw them in your garden bed. Unlike common garden earthworms, which burrow deep into the ground to feed, red wigglers won’t survive unless their food supply is near the soil surface.
- Do harvest your worm castings at least twice a year. At high concentrations, the castings can create an unhealthy environment for your worms.
FREQUENTLY ASKED QUESTIONS
How long does it take worms to make compost?
Red wigglers are voracious eaters and can turn kitchen scraps into nutrient-rich compost in about two to three months. But keep in mind that it can take a couple of weeks for your worms to get comfortable in their new digs, so give them some time to work up an appetite.
What are the ideal temperatures for composting worms?
Red composting worms thrive in temperatures ranging from 55° to 80°F, but can tolerate colder or warmer temperatures as long as they aren’t extreme (above 80° or below 32°F). Keep in mind, these temps are inside the worm bin, not air temperature. If you move your worm bin outside during the summer, be sure to place it in a shaded location protected from rain and wind. When the weather turns colder, insulate the bin from freezing temperatures or move it indoors to a basement, heated garage, or a corner of your kitchen. In cooler temperatures (32° to 54°F), worms will work more slowly and you may need to decrease the amount of food scraps you give them.
Does worm compost have a strong odor?
Properly made vermicompost has a slight but inoffensive odor, making a worm bin well-suited for indoor use. If you begin to notice an objectionable smell, it’s most likely due to rotting food and not the compost itself. If this happens, cut back on the amount of food you feed your worms and make sure to bury the scraps under a layer of bedding.
What are the cons of worm composting?
In general, setting up and managing a worm bin requires very little effort. But the volume of vermicompost you can produce will be significantly less than what you can make using traditional composting methods. You also need to cater to the specialized needs of your worms, such as giving them the right amount of moisture and a well-balanced diet, to keep them productive and healthy. Monitoring the process can be time-consuming, and quality can suffer if you don’t manage your worm bin correctly.
How many worms should you start with for composting?
That typically depends on the size of your bin. Generally, you should start out with about a 1/2 pound of worms per square foot. Keep in mind that red composting worms breed quickly, doubling their population within a few months. You can always add more worms later once you are confident that your bin is worm-friendly.
How long do composting worms live?
Under ideal conditions, red worms can live a year or longer in a vermicomposting bin, but once a worm dies you probably won’t notice. It will simply become part of the compost, to be replaced by a new generation of worms.
Can you use both compost and worm castings?
Yes, using the two together is a great option and gives your plants the best of both worlds. Because worm castings are hard to produce in large quantities, consider mixing traditional compost throughout your garden beds and then using worm castings as a top dressing during the growing season.
RELATED:
Black Spot on Roses
Pests, Diseases, and Other Garden Problems

